目次
画像を透明にする方法
![赤丸先生](https://amuos1210.yurushoku.com/wp-content/uploads/2020/06/赤丸先生.png)
赤丸先生
まずは、透明pngにする方法を解説するよ。
はーい
![青丸くん](https://amuos1210.yurushoku.com/wp-content/uploads/2020/06/青丸くん.png)
青丸くん
![赤丸先生](https://amuos1210.yurushoku.com/wp-content/uploads/2020/06/赤丸先生.png)
赤丸先生
この方法は、こんな時に使うよ。
![PowerPoint 周りの背景は、青で、
その中に青丸君がいる。
ただし、青丸君の周りに白いものがある。](https://amuos1210.yurushoku.com/wp-content/uploads/2020/08/image-46-1024x569.png)
あれ?僕あんなに目が小さかったっけ?
あと、僕の周りになんか白いのが、
PowerPointに画像を入れるとこうなっちゃうの?
![青丸くん](https://amuos1210.yurushoku.com/wp-content/uploads/2020/06/青丸くん.png)
青丸くん
![赤丸先生](https://amuos1210.yurushoku.com/wp-content/uploads/2020/06/赤丸先生.png)
赤丸先生
そういう意味じゃないよ。
WordやExcel、Scratchで開いてもそうなっているはずだよ。
![赤丸先生](https://amuos1210.yurushoku.com/wp-content/uploads/2020/06/赤丸先生.png)
赤丸先生
これの対処法は、簡単だよ。
「画像を選ぶ」→「書式」を押してね。
次に、「色」→「透明色を指定(S)」と押してね。
![色→透明色を指定(S)を押しているところ](https://amuos1210.yurushoku.com/wp-content/uploads/2020/08/image-47.png)
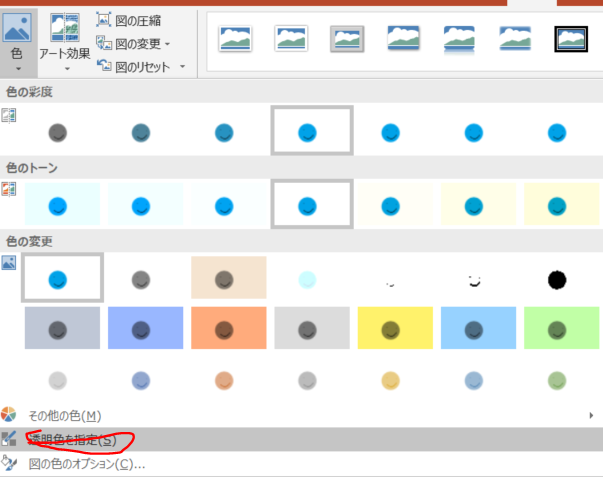
そうすると、マウスポインターの形が変わるから、それで四角の所をクリックしてね。これで
OK!
画像によっては、少しだけ白いのが残る場合があるよ。だから、そういうときは、ソフトを使おう!手軽に透明pngというソフトを使うといいよ。
じゃあ、
![青丸くん](https://amuos1210.yurushoku.com/wp-content/uploads/2020/06/青丸くん.png)
青丸くん
![2人](https://amuos1210.yurushoku.com/wp-content/uploads/2020/06/2人.png)
2人
ばいばーい